My First Warhammer Figurine
- 20114328
- Dec 22, 2020
- 4 min read
While I have been sure to enjoy the Christmas break to the fullest (well, as much as I can given the COVID-19 situation), I have made sure to keep myself busy. I customised two full dolls as Christmas presents, so I will be posting photographs of them after the recipients have opened their gifts. When I finished them and realised I would have a few days of 'limbo' before Christmas, I decided to try something new that I have been meaning to do for a while now- paint a Warhammer figurine.
I had not done this before now as I was not very confident with my brushwork and wanted to try and improve my skills first, gradually working on smaller and smaller items until I reached a similar scale to the figurines. The scale of this set of figures, the Stormcast Eternals Sequitors, was my target. They are about 70 mm tall.

(This particular image is not mine.)
An example of my practice prior to painting any of these is a 3D-printed figure of the character 'Tracer' from the video game Overwatch. As I am a big fan of this game and have been inspired by the character designs time and time again, I thought that painting this character would be a very fun practice run. The model is 90mm tall and printed in PLA on our Prusa Mk 2.5S printer. Credit for the .stl file goes to Printed Obsession on MyMiniFactory.
https://www.myminifactory.com/object/3d-print-overwatch-tracer-full-figure-42704
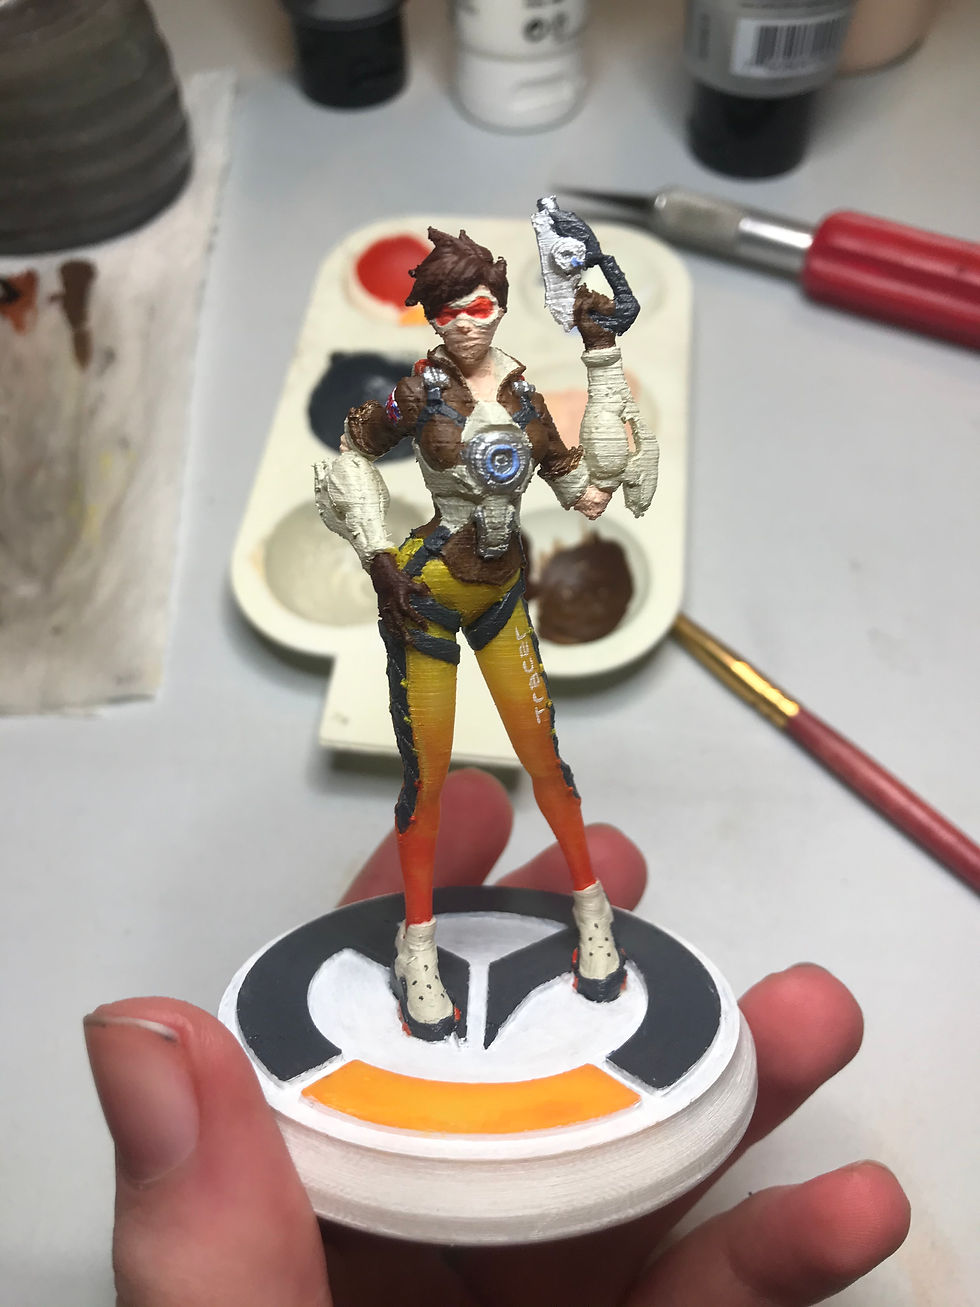


I am very proud of the paintjob I did on this model. I am especially happy with the gradient of yellow to orange, the lettering and the patches on her sleeves. Sadly, due to the fact I printed her with filament rather than something like resin, the layers are very visible, even more so with the paint to show them up. I feel that they bring the quality of the figure down significantly, which is a shame. Overall, I would still call this figure a success.
With that model under my belt, I felt a lot more confident to start on a Warhammer figure.
I cut all of the parts from the sprue they came on and put them all together. One of them had two options for the head- a helmet with a plume, or no helmet. I chose the no helmet option as I knew that while painting a face on that scale would be a challenge, I would enjoy it very much.
I chose one of the three figures and primed it with black gesso to start.

I was referencing images of the colour scheme constantly throughout this project. I decided that one of the most dominant colours on this figure was blue, so I started with that.
I used Citadel Kantor Blue to paint the shield, pauldrons and robes.

After the blue dried, I picked up my pot of Citadel Retributor Armour, a beautiful shade of gold, to paint in the armour sections, details on the shield and sections of the Maul (the weapon they carry). This colour was very satisfying to work with. It sparkled in a very cool way when it was wet and developed a metal like shine as it dried.

With the gold in place, I moved on to Citadel Khorne Red next. I used it for the revers of the loincloth as well as some of the details of the Maul.

After adding the red, I chose to beef up and touch up the areas of the model that are meant to be black with Citadel Abaddon Black, like the wrists and the gaps between the armour. It may not have made a significant visual difference, but I was happier knowing that the texture of the paint was definitely correct for building upon.

I will never deny my love for metallic paints, so I was happy to move on to using the silver tones of Citadel Leadbelcher for the Maul and repeated anvil imagery present throughout. I also did a tiny bit of detailing with Citadel Celestra Grey while I was on.

With Citadel Rakarth Flesh, I painted in a basecoat for the stonework on the model's base, as well as sections of the robes and loincloth. For the fabric areas, it made a nice off white base to add more depth to with the white highlighting later on.

For the dirt around the base and two tiny straps around the bottle at their hip I used Citadel Mournfang Brown. This colour was a little darker than I would have liked for the dirt, but it ended up working out quite well in the end.

For the inside of the main robes and the lightning bolt imagery, I turned to Citadel White Scar to brighten things up. I forgot to photograph the pot of Citadel Nighthaunt Gloom at this point- I used it to paint a base coat for the bottle at this stage as well.

With that, all of my base colours were on the figure. I let them dry overnight before continuing with more detail. It was also at this point that I took a step back to look at my work and evaluate the quality of my paintjob so far. I was very happy for the most part. For anything that I wasn't quite satisfied with, I just said "Nothing another coat can't fix." and left it to thoroughly dry.


When I came back to it the next day, I was determined to finish it. I used different techniques like washing and dry brushing until I was satisfied with my shading, highlighting and detailing. The colours I used that I have not yet mentioned are:
Citadel Armageddon Dust
Citadel Reikland Fleshshade
Citadel Bugman's Glow
and mixtures of the colours I have mentioned in this post to achieve a green for the leaves, a lighter brown for the dirt and many different shades of blue.


Comments